Modelling


During this advertisement break, Hokey-Pokey may be bought from the gentleman with the handcart at the front.
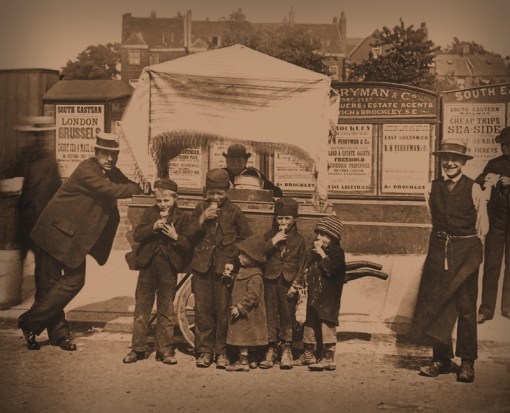
Victorian ice cream - a.k.a. Hokey-Pokey. Contamination often proved to be a serious health risk. Photograph ©Public Domain.

Victorian ice cream – a.k.a. Hokey-Pokey. Contamination often proved to be a serious health risk. Photograph ©Public Domain.

Consume at your own risk; the management refuses to accept the presence of fleas, torulæ, bacilli, lice, bed bugs, cotton fibres, bugs legs, straw, cocci, human hair or cat and dog hair in the ha’penny ices. Nor will the management be responsible if you contract scarlet fever, diphtheria, typhoid or diarrhoea  from partaking of these treats.

***

Activity Media‘s ‘Right Track’ DVDs have been helping modellers improve their techniques for almost 10 years. The latest in the series – number 19, believe it or not – takes us right back to the beginning with layout planning and design.

Unless your surname name is Freezer or Rice (oh, OK then, or Dunkley!) then chances are that at some point in the planning of your latest masterpiece you’ve sat with a blank sheet of paper in front of you and a waste basket full of scrunched up paper trailing behind.

Fortunately Paul Lunn’s name can be added to that list of luminaries of layout design, and coupled with Paul Marshall-Potter’s skilled eye for translating a design from paper to stunning model, this team presents a powerful addition to the Right Track series.

Many of us railway modellers are wedded to a scale and gauge, and this is the first sacred cow to be unceremoniously kicked over, and a compelling argument is put forward for choosing scale based on wants and needs from a new layout. Coupling choices are the next element to stand in the dock, and not just on the usual ‘play value versus scale appearance’ card we’re all so used to hearing, but instead based on how train length is affected by one type or the other, and how that impacts on our design. Thought provoking stuff.

With our comfortable world now turned upside down, we’re suddenly find ourselves within the habitat of the modeller; all so often our esoteric little hobby drags us away from family down into the shed at the bottom of the garden on a wet and windy night or up into the sauna-like humidity of a loft space in high summer. Not the always the best for harmonious household relations, and it needn’t be so. Based on a stylised representation of footfall though the house, we’re shown where hitherto unconventional sites for a ‘shelfie’ may in fact prove to be ideal and leave us feeling a little less like Johnny-no-mates.

On to the nitty-gritty; what do we want from a layout? Actually, what do we need might be the better question, and after writing out a checklist we’re building a quick mock-up from card and foam to see if all these elements of desire and necessity actually work together. Our perception of perspective, layout width and the backscene are briefly challenged – a foreshadow of things to come later in the programme.

Another chestnut roasted on the fire is the argument of prototype verses freelance trackplan, and Paul Lunn takes us though developing a layout based on a prototypical plan which ticks most of the boxes on our checklist. This is smartly followed up by the design of a freelance layout based on prototypical practice, but developed specifically to incorporate the choices we’ve made and rounds off the first hour of the DVD.

Moving from a two dimensional plan to a three dimensional layout can be a daunting task, and Paul Marshall-Potter describes how a very workable trackplan he had for a transition-period urban East End layout just simply didn’t ring true once he began the 3D process.

This revelation sets the scene for the next hour’s viewing where Paul Lunn takes the plan and turns it into three completely different but plausible alternatives;

  • A 1950s West country bucolic station which introduces us to the necessity of the overall visual balance of a layout
  • A 1980s aggregate works, in which the often haphazard placement of view-blocks are challenged, where features are moved to de-compact the view, promote sight-lines, and to make their inclusion and placement more logical. In addition, lighting and how to eliminate shadows from the backscene are considered.
  • Wharfdale Road where we revisit some of the earlier choices such as space, couplings, length of sidings and loops and the use of smaller prototypes to suit the layout footprint. Paul Lunn takes the original premise, converts it into a layout design, and then Paul Marshall-Potter adapts it to build the DVD’s project layout.

Again we revisit earlier themes and are shown practical examples of how to force perspective at the ends, the advantages of a natural eye-level viewpoint, how to control sight-lines at the entrance/exit of the scenic section and the effect of curved corners on the backscene.

Photograph ©Activity Media

Rounding this section off we also consider how a viewer’s eye is naturally drawn to the centre of the layout, and how the often-used half-relief gable ends of buildings – which look great head on, but rather silly from the side – can be diffused with tree lines to create a more convincing background.

With the second hour up we move to the inner sanctum where the crown jewels are kept; Paul Marshall-Potter’s two layouts, Bawdsey and Albion Yard. The former was originally built by Chris Matthewman in the early 1990s, and was based on 1930s practice in East Anglia. Paul discusses the changes he has made to bring the timeframe forward to the transitional period of the early 1960s, the weaknesses of the typical early 1990s construction elements such as open fiddle yards, segmented low backscenes with right-angled corners and how he’s overcome them.  Designing layout construction for transport is also touched on. Albion yard, on the other hand, was designed and built solely by Paul and  incorporates modern and some very forward-thinking elements, such as the long and high single piece printed backscene which extends beyond the scenic area into the enclosed fiddleyard for visual purposes.

All in all it’s a valuable addition to the Right Track range, and particularly if you’re at the beginning of a new project, or part way through one and you’re feeling jaded as it’s not working out as you’d hoped.

On being sent my gratis reviewer’s copy, I was told to tell it as it is; good or bad – don’t pull your punches. Despite not receiving my promised reviewer’s fee of a bacon sandwich (you owe me in sauce Mistah PMP), I thoroughly recommend this DVD to newcomers of the hobby and grizzled old hands alike.
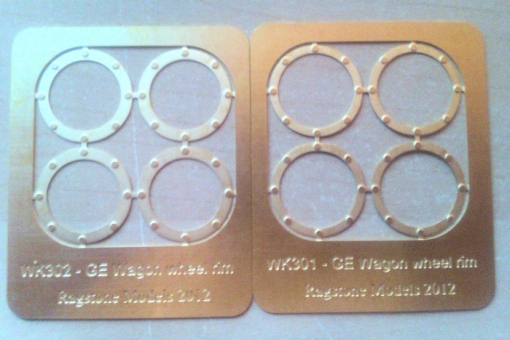
Following on from the discussion generated in parts one and three in this series of Great Eastern wagons on wheels inserts, through the post came a packet from Andy Beaton of Ragstone Models, purveyor of fine kits and castings for the discerning modeller, in which were two pre-production etches for these very wheel inserts.

Ragstone Models’ GER wagon wheel inserts. Photograph ©Adrian Marks

WK302 are scaled at 3½” wide and WK301 at 2″ wide. Even though my GA for a GE wagon of the 1890s doesn’t indicate the dimensions of the insert, I was able to ascertain the width was probably about 2¾”. Following discussion with Andy we agreed that the thinner one ‘looks right’ when installed on a Slater’s wheel, and I’ll follow this post up later with photos showing this.   I suggested to Andy that the domed bolts  looked a bit too big on the narrower inserts, but conversely, the ratio of the rivet size to the width of the wider insert looked pretty good.  Once painted, weathered and given suitable highlights and shadows I’m sure they will look the part.

Just an update on this earlier post with some better photos as promised. This time I was able to use natural light which makes a big, big difference.

© Adrian Marks

© Adrian Marks


Ref: LB&SC Locos Pt.2: D1 Tanks

It’s been quite a while since I’ve posted to the Journal – a case of life getting very much in the way of model making, even of the armchair (I should be so lucky) variety. Fortunately Graham has kept you all rapt with his track making exploits, the results of which are stunning.

Something else stunning tumbled through the letterbox this morning; an exquisite set of etched number plates for No.299 New Cross. The model will be based on the Albion Models kit, so the plates are now safely stashed away with the etchings and castings for one fine day.

The plates are from Chris Watford’s Severnmill Models range, and there are quite a few LB&SC number plates in his catalogue, each priced £10. Other Brighton number plates not currently in the range cost £20 for the design and supply of one pair, and in the next few weeks Chris expects to be producing his last batch of etchings, so now is a very good time to stop procrastinating and order what you need (or might need if a modelling whim takes you!).

Basilica Fields is a 7mm model of a railway set within the context of the East End of London…  a “what if” railway with a supporting history which is sometimes somewhat different to the expectations of academics and historians of all persuasions.  Within the world of Basilica Fields there are several, separate, “scenes” which represent different railway locations in the vicinity of Bishopsgate – Artillery Lane is the first scene to be brought before the public gaze.  The railway history of Basilica Fields is set in late Victorian / early Edwardian days and this brings a pleasing benefit in that the model shall present railway services from up to seven railway companies running on the tracks of just one or two, or maybe, three pre-grouping railways.

The permanent way for Basilica Fields is built to S7 standards – 7mm scale modelling with a track gauge of 33mm, (Scaleseven track and wheel standards).  There is no “S7 equivalent” to buying a box of “O-gauge track” over the shop counter so all of the permanent way for Basilica Fields is hand-built.  As the S7 standards for track are generally independent of company….  and track has to be constructed to represent the permanent way of at least three pre-grouping companies (Metropolitan Railway, Great Western Railway and Great Eastern Railway)….  then this post describes the construction of plain track in a generic way.  Where the 7mm track has a feature which is company-specific then that feature is covered within the descriptions of the prototype permanent way; so for example:- the use of a jig to provide sleeper spacing is described here whilst the details of the sleeper spacing are to be found in the respective descriptions of Permanent Way.

So where to start?  Perversely, with the end product so as to explain the philosophy behind preparation of parts.

I have been making S7 track for at least five years and what follows represents my approach to achieving a consistent result and where the initial colouring of the components has been achieved before assembly.   The appearance of the track panels at this stage is “clean”…. colouring of components before and weathering after assembly is easier than assembly/laying/painting in place.  All of the weathering is to be done after the track has been laid and the techniques are to be covered in a separate post.

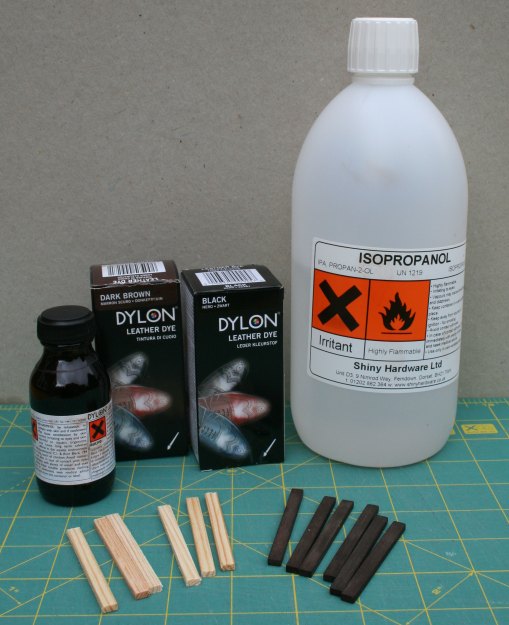
The sleepers are made from Lime and are of scale 9′ x 10″ x 5” dimensions.  The sleepers for Basilica Fields are supplied ready-cut from Perfect Miniatures.  The colouring process uses shoe dyes with IPA to let down the intensity of the dye and as a medium when the sleepers are immersed in the dye.  Much of the track of Basilica Fields is set in brick-lined cuttings where the sun shines on the track for just a few hours of the day, so the initial staining of the sleepers represents timber which has retained something of its original colour and yet appears to be damp and dirty.  The initial stain is a 10% by volume solution of the brown dye….  with several “dips” to build up the colour.  After the sleepers have attained a deep brown colour the damp and dirty colouration is applied by immersion in a solution of 10% brown and 10% black by volume.

In the beginning - dyeing materials

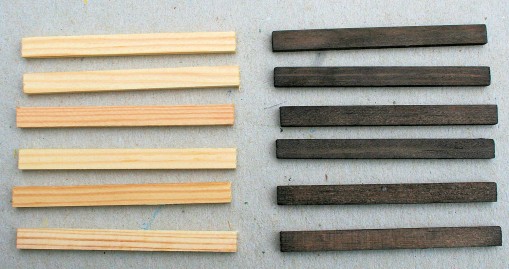
The stain solution is made up in a plastic tub, the sleepers dropped in and the tub agitated (gently!) to ensure that the sleepers are covered and wetted all over.  After five minutes in the solution the sleepers are drained using a metal kitchen sieve (retained for the sole use in staining) and then left to dry on newspaper…  with the drying sleepers being “tumbled” occasionally to promote the drying process and to avoid a blotchy appearance.

Sleepers - before and after

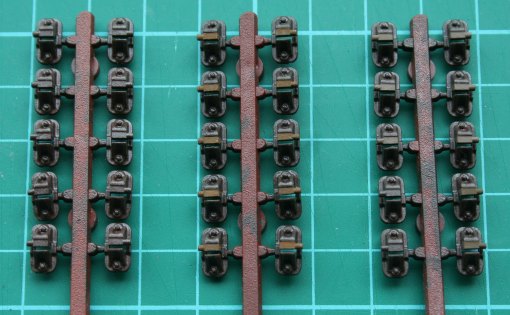
Now on to the chairs…  in this case the chairs are from the C&L Finescale range as being similar to those used by the GWR circa 1895, (see the drawing in GWR PW for Gun Street).  Enamel paints (Humbrol) are used for painting the chairs with the “dirt and weathered rust” colour from a palette of black, brown and gunmetal (33, 133 and 53 respectively).  The oak keys are then painted using a mix of  “track dirt” and “rusty rails” (Precision Paints).  Keen-eyed readers will spot that the chair sprue has chairs with keys to the left and chairs with the keys to the right….  this difference between “LH” and “RH” chairs is important when fitting chairs to the rail.

Painted chairs - rusty (left) and dirty keys (centre and right)

Sleepers are loaded into a jig which enables sleeper spacing along the rail to be replicated for each new panel; in this case all of the sleepers are the same width (GWR – 10″), where a track panel has wider sleepers at the ends then that increased width is accomodated within the appropriate jig (Met. Rly. – 12″).  Chairs are slid onto the rail, which is blackened chemically, with care taken to ensure that the keys are aligned correctly for the intended use of the track panel (and with the keys of the outermost chairs arranged so as to be “driven” towards the fishplates).  The rails are held at 33mm apart by S7 Group track gauges – available from the S7 Group stores and a benefit of group membership.

The chairs are fixed to the sleepers by Butanone which is applied by brush on eitherside of a chair where the chair touches the sleeper.  The chairs are moulded in ABS and that plastic is soluble in Butanone.  The solvent runs into the gap between the chair and sleeper, dissolves the base of the chair and the resulting ABS “gloop” gets drawn into the grain of the sleeper (by virtue of the solvent which has been absorbed by the timber).

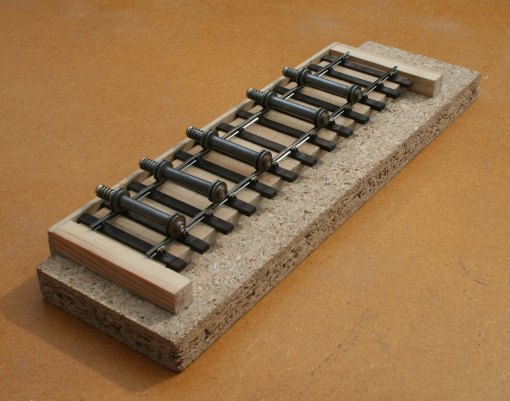
The jig is a piece of 3/4″ chipboard upon which is fixed a distance piece cut from 4mm MDF – the MDF is 55mm wide and less than the length of the sleepers (63mm).  Thin, 1/16″, ply spacers are glued on top of the distance piece – the width of the spacers is such as to place the sleepers at the required centres. The sleepers extend beyond the distance piece so that an assembled track panel can be removed by raising all sleepers at the same time rather than sliding the panel sideways (if a sleeper sticks as a panel is slid sideways then that “sticky” sleeper can impart a twisting moment to the bond between chairs and sleepers).


track jig with sleepers and rail/chairs/gauges

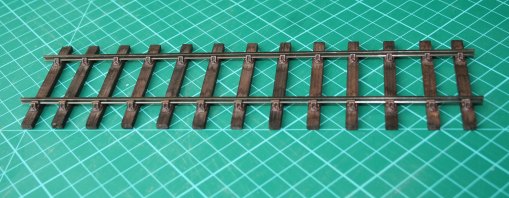
“Here is one I prepared earlier”…  a representation of a GWR track panel with 32′ rails, 13 sleepers and appropriate chairs and fishplates (as in the GW PW post referenced earlier).

The final result - a representation of GWR track panel, 32'0" rails, 13 sleepers, circa 1895

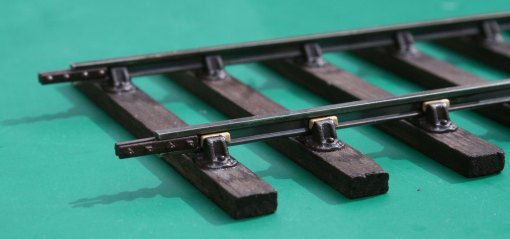
One of the benefits of 7mm scale modelling is that parts are bigger and more detail can be included.  Exactoscale locking fishplates are fitted to the track here, these fishplates are moulded in ABS and hence provide insulation between rails.  Each moulding has bolt heads on one side, and nuts on the other side, of the moulding.  The light colour of the keys allows the placing of the keys to be seen with the outermost chair placed so that the key is “driven” towards the fishplate.

Completed track - fishplates and keys

Graham