Basilica Fields is a 7mm model of a railway set within the context of the East End of London… a “what if” railway with a supporting history which is sometimes somewhat different to the expectations of academics and historians of all persuasions. Within the world of Basilica Fields there are several, separate, “scenes” which represent different railway locations in the vicinity of Bishopsgate – Artillery Lane is the first scene to be brought before the public gaze. The railway history of Basilica Fields is set in late Victorian / early Edwardian days and this brings a pleasing benefit in that the model shall present railway services from up to seven railway companies running on the tracks of just one or two, or maybe, three pre-grouping railways.
The permanent way for Basilica Fields is built to S7 standards – 7mm scale modelling with a track gauge of 33mm, (Scaleseven track and wheel standards). There is no “S7 equivalent” to buying a box of “O-gauge track” over the shop counter so all of the permanent way for Basilica Fields is hand-built. As the S7 standards for track are generally independent of company…. and track has to be constructed to represent the permanent way of at least three pre-grouping companies (Metropolitan Railway, Great Western Railway and Great Eastern Railway)…. then this post describes the construction of plain track in a generic way. Where the 7mm track has a feature which is company-specific then that feature is covered within the descriptions of the prototype permanent way; so for example:- the use of a jig to provide sleeper spacing is described here whilst the details of the sleeper spacing are to be found in the respective descriptions of Permanent Way.
So where to start? Perversely, with the end product so as to explain the philosophy behind preparation of parts.
I have been making S7 track for at least five years and what follows represents my approach to achieving a consistent result and where the initial colouring of the components has been achieved before assembly. The appearance of the track panels at this stage is “clean”…. colouring of components before and weathering after assembly is easier than assembly/laying/painting in place. All of the weathering is to be done after the track has been laid and the techniques are to be covered in a separate post.
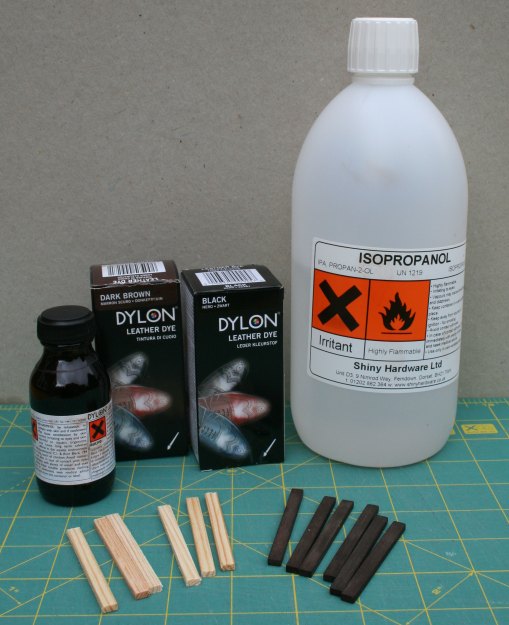
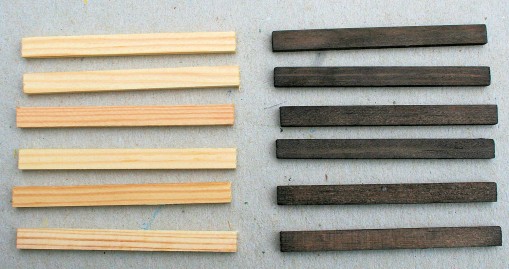
The sleepers are made from Lime and are of scale 9′ x 10″ x 5” dimensions. The sleepers for Basilica Fields are supplied ready-cut from Perfect Miniatures. The colouring process uses shoe dyes with IPA to let down the intensity of the dye and as a medium when the sleepers are immersed in the dye. Much of the track of Basilica Fields is set in brick-lined cuttings where the sun shines on the track for just a few hours of the day, so the initial staining of the sleepers represents timber which has retained something of its original colour and yet appears to be damp and dirty. The initial stain is a 10% by volume solution of the brown dye…. with several “dips” to build up the colour. After the sleepers have attained a deep brown colour the damp and dirty colouration is applied by immersion in a solution of 10% brown and 10% black by volume.
The stain solution is made up in a plastic tub, the sleepers dropped in and the tub agitated (gently!) to ensure that the sleepers are covered and wetted all over. After five minutes in the solution the sleepers are drained using a metal kitchen sieve (retained for the sole use in staining) and then left to dry on newspaper… with the drying sleepers being “tumbled” occasionally to promote the drying process and to avoid a blotchy appearance.
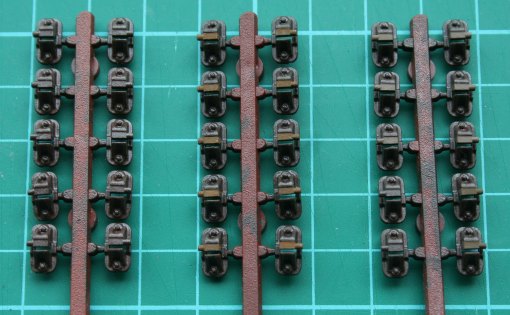
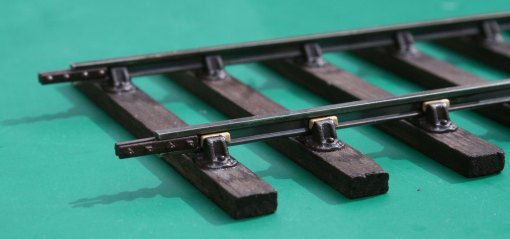
Now on to the chairs… in this case the chairs are from the C&L Finescale range as being similar to those used by the GWR circa 1895, (see the drawing in GWR PW for Gun Street). Enamel paints (Humbrol) are used for painting the chairs with the “dirt and weathered rust” colour from a palette of black, brown and gunmetal (33, 133 and 53 respectively). The oak keys are then painted using a mix of “track dirt” and “rusty rails” (Precision Paints). Keen-eyed readers will spot that the chair sprue has chairs with keys to the left and chairs with the keys to the right…. this difference between “LH” and “RH” chairs is important when fitting chairs to the rail.
Sleepers are loaded into a jig which enables sleeper spacing along the rail to be replicated for each new panel; in this case all of the sleepers are the same width (GWR – 10″), where a track panel has wider sleepers at the ends then that increased width is accomodated within the appropriate jig (Met. Rly. – 12″). Chairs are slid onto the rail, which is blackened chemically, with care taken to ensure that the keys are aligned correctly for the intended use of the track panel (and with the keys of the outermost chairs arranged so as to be “driven” towards the fishplates). The rails are held at 33mm apart by S7 Group track gauges – available from the S7 Group stores and a benefit of group membership.
The chairs are fixed to the sleepers by Butanone which is applied by brush on eitherside of a chair where the chair touches the sleeper. The chairs are moulded in ABS and that plastic is soluble in Butanone. The solvent runs into the gap between the chair and sleeper, dissolves the base of the chair and the resulting ABS “gloop” gets drawn into the grain of the sleeper (by virtue of the solvent which has been absorbed by the timber).
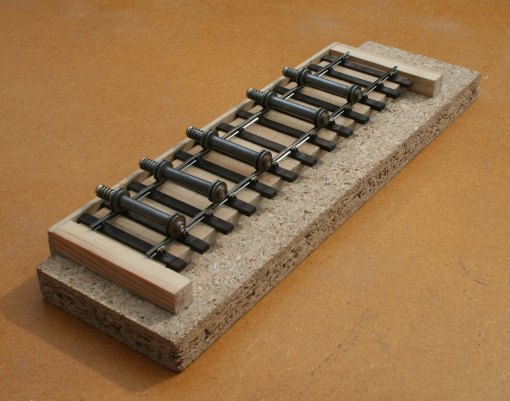
The jig is a piece of 3/4″ chipboard upon which is fixed a distance piece cut from 4mm MDF – the MDF is 55mm wide and less than the length of the sleepers (63mm). Thin, 1/16″, ply spacers are glued on top of the distance piece – the width of the spacers is such as to place the sleepers at the required centres. The sleepers extend beyond the distance piece so that an assembled track panel can be removed by raising all sleepers at the same time rather than sliding the panel sideways (if a sleeper sticks as a panel is slid sideways then that “sticky” sleeper can impart a twisting moment to the bond between chairs and sleepers).
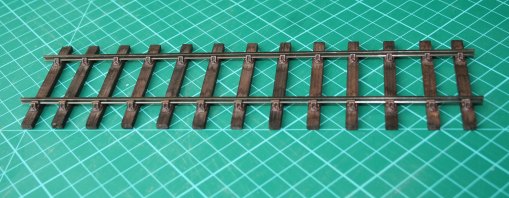
“Here is one I prepared earlier”… a representation of a GWR track panel with 32′ rails, 13 sleepers and appropriate chairs and fishplates (as in the GW PW post referenced earlier).
One of the benefits of 7mm scale modelling is that parts are bigger and more detail can be included. Exactoscale locking fishplates are fitted to the track here, these fishplates are moulded in ABS and hence provide insulation between rails. Each moulding has bolt heads on one side, and nuts on the other side, of the moulding. The light colour of the keys allows the placing of the keys to be seen with the outermost chair placed so that the key is “driven” towards the fishplate.
Graham
May 18, 2011 at 3:11 pm
Lovely work.
Does the chemical blacking process make it difficult to solder wires to the rail?
May 18, 2011 at 4:05 pm
Yes… but then you knew that -probably ….
Although not agreed definitely as yet between Adrian and I, here is my approach to providing power feeds. The underside of the rail is cleaned and tinned at the required location for the feed. A piece of brass or nickel, probably from etch scrap, is bent into a “L” shape where the foot of the “L” is about 3mm in length and the upright is about 5cms in length. The “L” is blackened and then the foot cleaned and tinned. The foot of the “L” is soldered to the underside of the rail so that the upright of the “L” is against a sleeper… ought to be pretty well hidden.
regards, Graham
May 18, 2011 at 8:40 pm
I had an inkling, and wondered if there was some magical solution which allowed one to solder blackened metal: sadly not, it would seem.
Keep up the good work!
Simon
May 18, 2011 at 4:01 pm
Excellent description Graham. You make it look very simple.
Is there any chance of a picture of the jig without the track panel in place?
May 18, 2011 at 4:34 pm
I thought that I had sent you a picture of the jig for the Met. Rly. track, about four weeks back – if not then I shall oblige.
Simples? No way hose! You ought to see the number of mails between Adrian and I in regard to desired colour and appearance of the sleepers… and of the chairs…
And then there were the mails about how to achieve the results… made even more interesting by the lack of the required Humbrol tinlets in the local Hobbycrafts store.
Building track is simple and soothing, the preparation takes the time.
S7 modellers have help with the range of gauges from the Group Stores, rather like the bits and pieces from the S4 Stores.
regards, Graham
May 18, 2011 at 11:30 pm
Hi, beautiful work there. I’ve just been doing some similar experiments. Like yourself I’m using the sleepers from Perfect Miniatures. My oft distant plan is to model a small shed scene and so the full depth sleepers from PM are great for the areas where the ballast has washed away. I’m just wondering why you used Shoe dye rather than wood dye? Or are they all one and the same? My tests used Rustins Wood dye and I just painted the sleepers whilst stuck to a templot printout rather than soaking them.
Also have you tried distressing any of the sleepers? I’ve not had much success, the dye just accumulates in the splits and makes it much darker. I suppose for the period you’re modelling that sort of neglect wouldn’t be tolerated, however my plans are set in the 1950’s when there was a certain amount of neglect.
May 19, 2011 at 9:51 am
Hi Adrian (of 4MT fame),
Please remember, with these posts, you get two S7 modellers for the effort of reading one journal – which means that we might have more than one way of doing things, as is the case here.
Adrian (of Buckjumper and Gobbler fame) wants to show the variations in ballast depth which characterised some of the Victorian railway scenes and that means full-depth sleepers. As Adrian contributes to the S7 West Mersea project he obtains sleeper supplies from Perfect Miniatures. The work of Steve Cook inspired Adrian to try shoe dye for colouring of the sleepers… and I got the job of trying. We did discuss spirit stains and that lost out when Adrian produced some tasty photographs of Steve’s track and a recipe. What neither of us expected was that the Lime sleepers did not take the dye as easily as suggested by Steve’s writings.
My interest is GW&GC Jt circa 1910-1912 and that leads to neat and tidy permanent way with ballast to the top of the sleepers so full-depth sleepers are not necessary. My preference for sleepers and timbers is the ply products of Exactoscale. As to colouring, my preference is spirit stain and I have a few tins of the real McCoy, Bowley’s and Colron, from when I worked in a model shop in the early 1970s.
Why did I immerse the sleepers in the solution? At this time the sleepers seem to need several dippings to build up the colour and with almost 100′ of track for Artillery Lane – and no templates in sight as yet – painting each one separately is a real no-go idea.
As to distressing (professional weathering?) of the sleepers, that is Adrian’s domain for post-assembly work. Your comment suggests that the you are roughing-up the sleepers before staining and if that is the case then I think that the dye process may leave you with streaks.
Lime versus ply… in the end the appearance after weathering may be the deciding factor for future work.
regards, Graham
May 19, 2011 at 10:04 pm
Thanks for the information, it’s useful to know. I think I’ll try soaking a few sleepers in wood dye before attacking them with a scrawker.
May 29, 2011 at 11:37 pm
An update on the sleeper colouring… Steve Cook had told us that the shoe dye could be “moved around” after drying… application of IPA to a dry,dyed,sleeper seems to dissolve the surface dye. So does Butanone… applying the solvent to the gap between chair/sleeper gave the sleepers a “lightening” of the colour around the base of the chairs.
As an experiment, I dipped some of the Lime sleepers in Bowley’s dark oak spirit wood stain… and the resulting sleeper colouring is, after drying, immune to Butanone. Maybe this is the way forward for staining future batches of sleepers.
The initial GWR track panels, plus several Lime sleepers which have been coloured with spirit stain, have been passed to Adrian for him to experiment with the weathering techniques.
May 26, 2013 at 7:08 pm
Just a word of thanks for the excellent information and the photos of chairs in these posts. Very useful, especially for those of use who do not have easy access to the physical remains and archives of the GWR.